MeshCore Management with RemoteTerm and Seeed XIAO ESP32S3 & SX1262
Apr 27, 2026
MeshCore is a peer-to-peer encrypted mesh radio communications system. It runs on inexpensive hardware and operates in license-free sub-GHz bands worldwide. MeshCore radios (called “companions”) require an interface to send and receive messages. Most commonly, people use one of the available mobile apps, but this requires physical proximity to the radio for Bluetooth or Serial communication.
The existing clients were alright, but weren’t quite doing it for me. So, I built Remote Terminal for MeshCore (RemoteTerm), an open-source application that runs on a server with a connected MeshCore radio. RemoteTerm provides an interface to the local MeshCore mesh, allowing any device on the same local network to send and receive messages via the radio. It’s extremely mobile-friendly, and also enables additional abilities such as:
Caching all received packets, decrypting as you gain keys
Running multiple Python bots that can analyze messages and respond to DMs and channels
Monitoring unlimited contacts and channels (radio limits don’t apply – packets are decrypted server-side)
Accessing your radio remotely over your network or VPN
Forwarding packets to MQTT, SQS, Apprise, etc., including community observer aggregators like LetsMesh and MeshRank
Visualize the mesh as a map or node set, view repeater stats, and more!
I have a great love of all things compact and efficient, and the kind folks over at Seeed were keen to see MeshCore running on a generously donated board. So, this tutorial provides a fundamental setup for running RemoteTerm on a Raspberry Pi using the Seeed XIAO ESP32S3 & SX1262 Kit as a companion radio and Raspberry Pi Zero 2W for a compact, all-in-one MeshCore solution for power users!
USB Micro to USB-A or USB-C (to power the Raspberry Pi)
Reliable power source for the Raspberry Pi (5V 2.5A recommended)
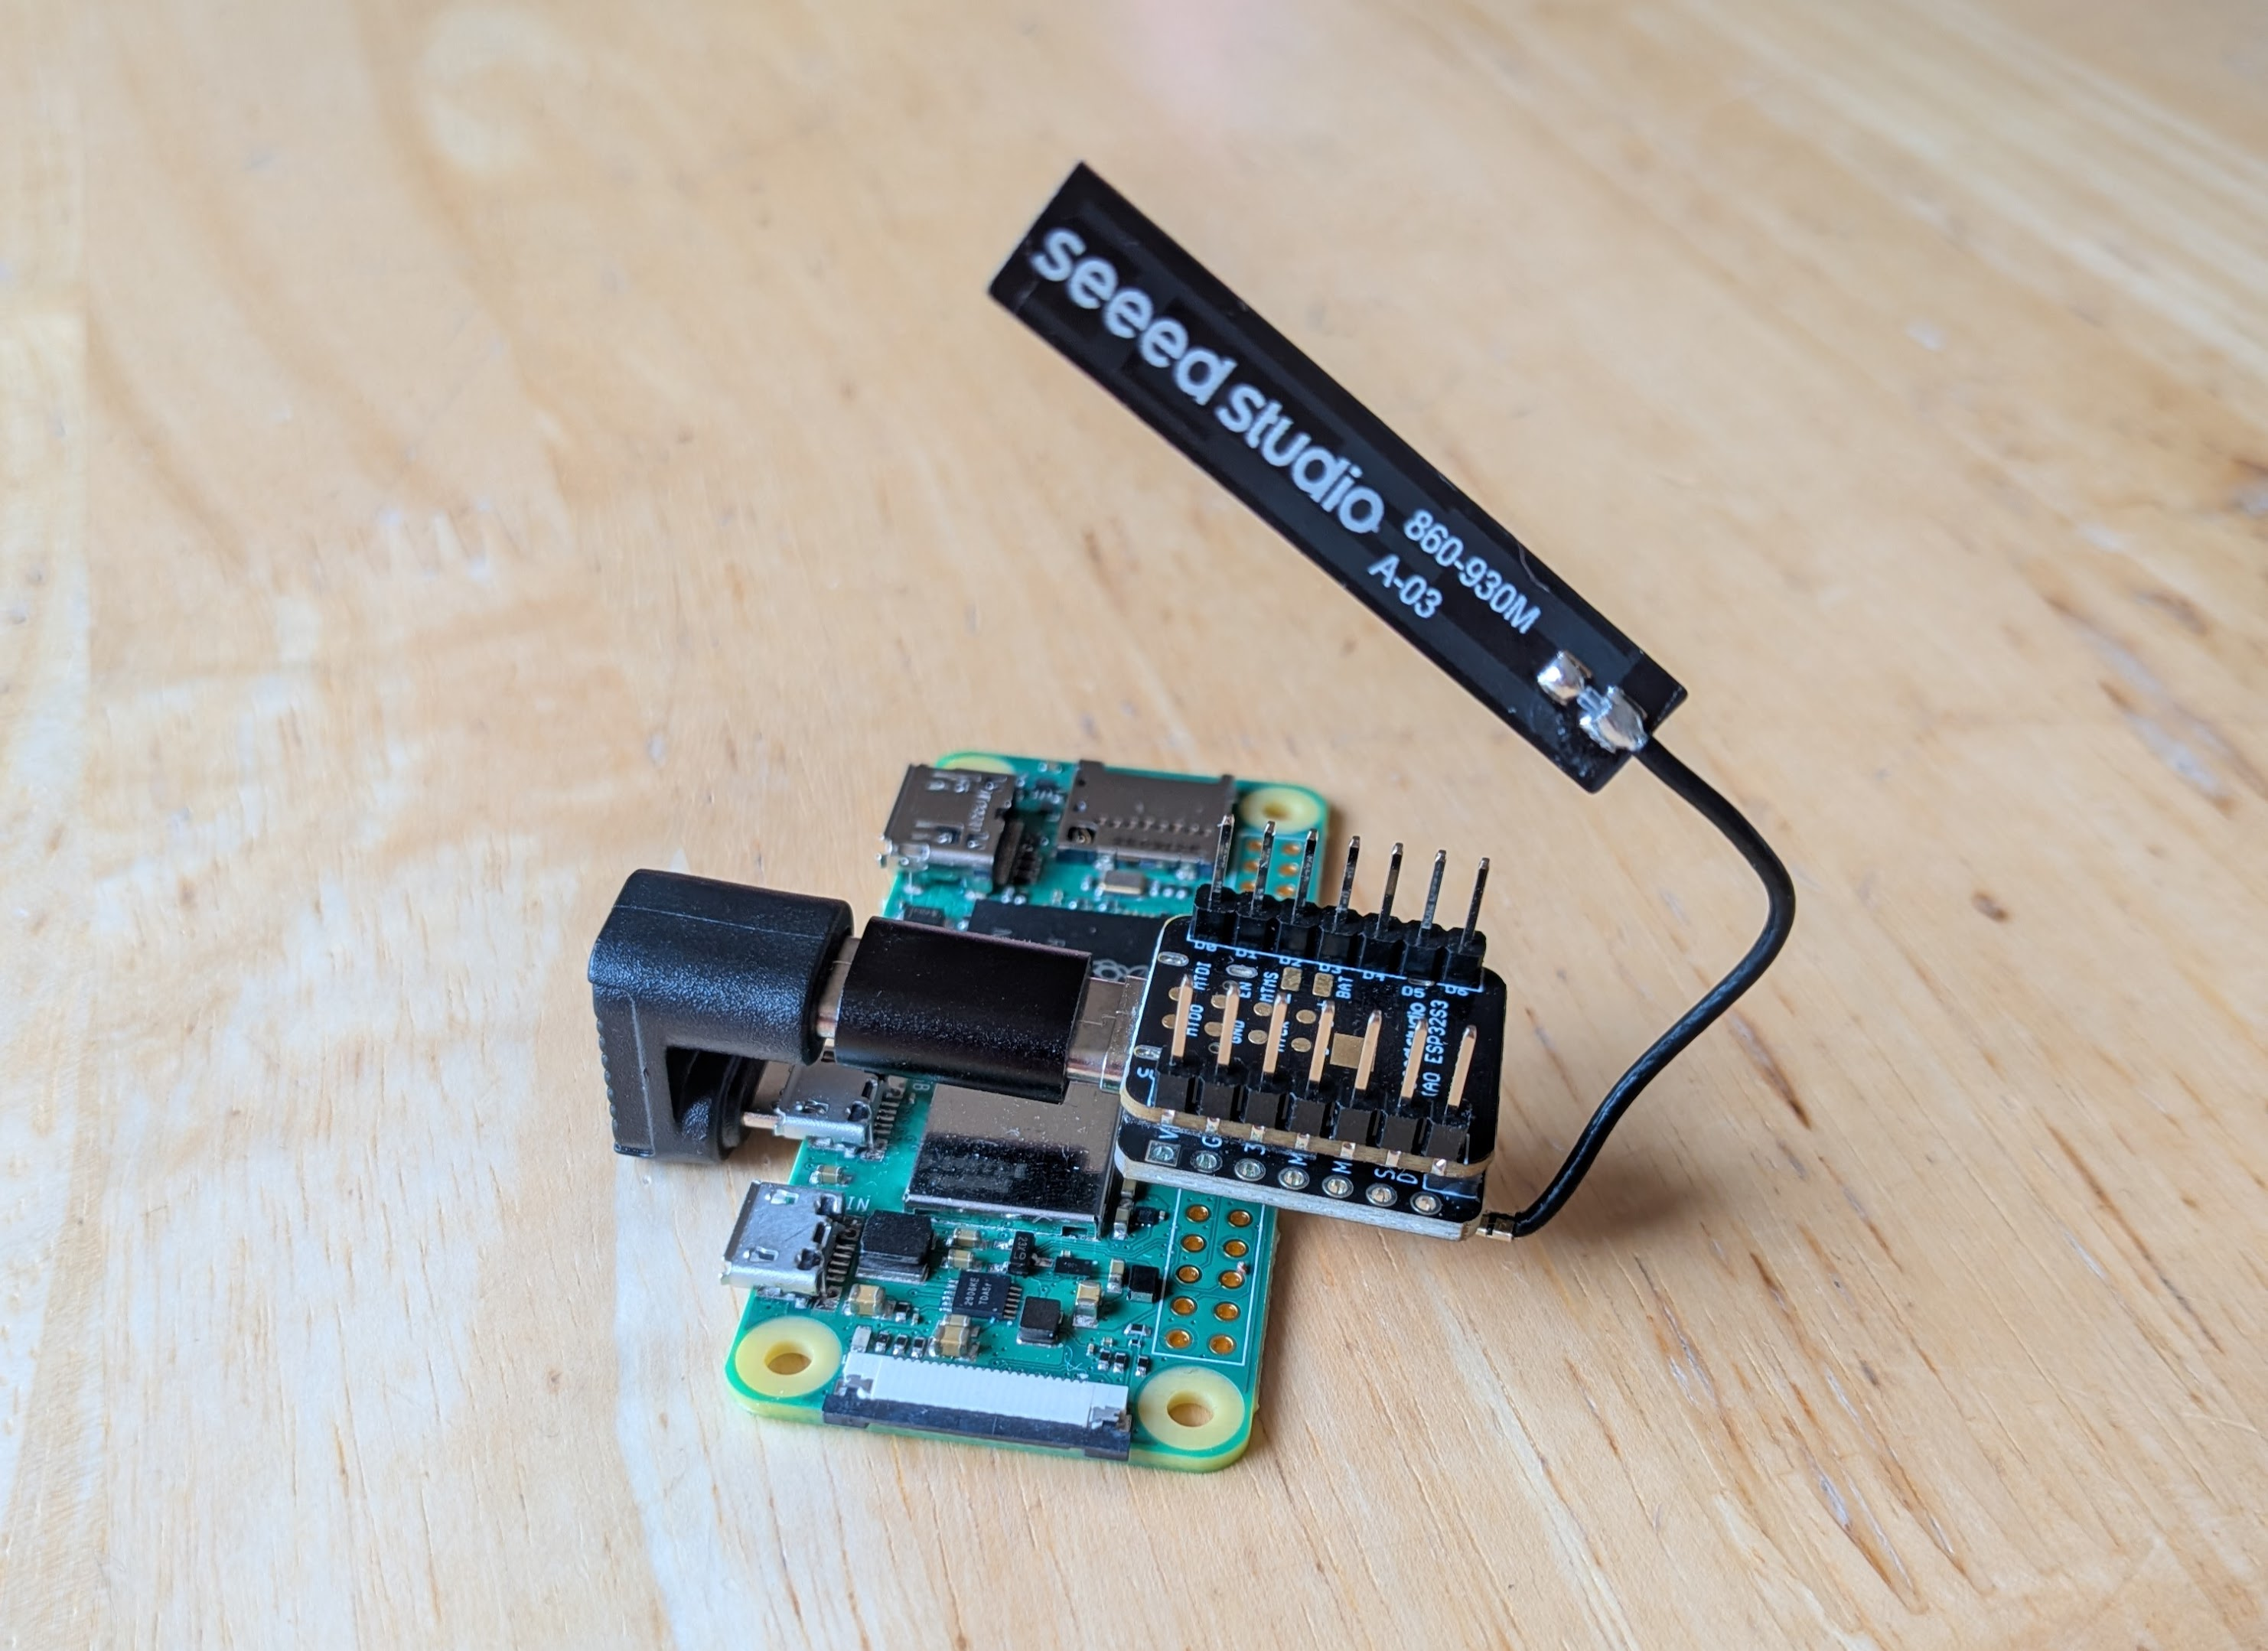
Note that there are many options for small-scale couplings, such as a USB Micro Male to USB-C 180 adapter and a USB-C male-male coupler to provide a tight, self-contained radio mount. Combine with a dongle board for an all-in-one radio/server combo ready to plug into a suitable power supply.
The author’s combined right-angle adapter board
Board Setup
Combine the Seeed XIAO ESP32S3 SX1262 boards using the coupler.
Attach the LoRA Antenna to the SX1262.
Plug into your computer or phone and flash with “Seeed Studio Xiao S3 WIO” (Serial Companion) per Seeed instructions.
Open the imager and select your Raspberry Pi model, and select “Raspberry Pi OS Lite (64 bit)” (or as appropriate for your particular board. “lite” distributions (without a desktop environment) are recommended for performance reasons.
Configure SSH and WiFi connection
Connect the radio to the Raspberry Pi’s USB port (not the POWER port), and connect power to the Pi
Use your home router’s admin interface to determine the address assigned to the Raspberry Pi. Consider allocating a DHCP reservation to prevent IP address changes.
Pi Configuration
Open an SSH session to the Raspberry Pi (e.g., ssh <username>@<ip address>)
Validate that the radio appears. find /dev/serial/by-id -maxdepth 1 -type l -print | sort should show a listing like /dev/serial/by-id/usb-Espressif_USB_JTAG_serial_debug_unit_XX:XX:XX:XX:XX:XX-if00
git clone https://github.com/jkingsman/Remote-Terminal-for-MeshCore.git
cd Remote-Terminal-for-MeshCore/
# configure the docker setup./scripts/setup/install_docker.sh
Configuration Option Walkthrough
The README provides setup instructions for the application if you want to set everything up yourself. However, the Docker setup script above provides a guided setup that is a good fit for most environments. Below is a brief explanation of each configuration step:
Image Source
Docker images of the source code are published periodically. Using the published image means you don’t have to build your own, which can take significant time on small systems. Using the prebuilt image is recommended unless your Pi is powerful enough to build its own image.
Transport
This tutorial instructs you to set up a serial companion. TCP and Bluetooth companions are supported by RemoteTerm, but are slightly more complicated to set up. If you’ve flashed your radio as a serial companion, you need to select serial here.
In this step, the setup script will attempt to autodetect your radio. If it doesn’t appear here, ensure your radio is connected and powered on. The earlier command find /dev/serial/by-id -maxdepth 1 -type l -print | sort can help to show the port your radio is on. You may manually enter a port here, but if it’s not autodetected, there’s a good chance the radio isn’t visible to the Pi, and the setup will fail.
Bot System
RemoteTerm supports creating Python bots that can respond to messages on the MeshCore network. However, bots should not run on a RemoteTerm instance connected to an untrusted network, as this can allow other people with network access to execute arbitrary Python code on your radio host. If you enable bots, you should set a username/password for your instance and use a Snakeoil certificate. If you disable bots (recommended on untrusted networks), you can always rerun the setup script and enable them later. Disabling bots is the safest approach if you’re not certain about your security posture or don’t plan to run them.
HTTP Basic Auth
HTTP Basic Auth provides simple username/password protection for your RemoteTerm instance and is highly recommended, especially if you have enabled bots.
HTTPS / Snakeoil TLS
Some functionality (desktop notifications, GPU-accelerated channel finder) depends on an HTTPS connection. Generating a snakeoil certificate will provide access over HTTPS, though it will trigger a warning because the self-generated certificate is not trusted by browsers by default. However, your connection will still be encrypted. It is recommended to do this if you have enabled HTTP Basic Auth, as otherwise your username and password will be visible to others on the same network as your RemoteTerm server.
Booting the Server
After you’ve configured your dockerfile via the setup script, run
sudo docker compose up -d
to start the server. The following commands may also be helpful:
sudo docker compose up -d # start RemoteTerm in the backgroundsudo docker compose logs -f # follow the container logs livesudo docker compose down # stop and remove the running containersudo docker compose restart # restart the container without changing the imagesudo docker compose pull && sudo docker compose up -d # upgrade to the latest published image and restart
Warning
RemoteTerm does full management of the radio, meaning that once a radio is connected to RemoteTerm, all contacts/channels will be imported and offloaded to RemoteTerm, and the contacts actually synced to the device will be governed by RemoteTerm. This means that RemoteTerm can be a poor fit for users who want to swap radios in and out while maintaining radio state (favorites, channels, etc.), regardless of app usage.
Hotspot (optional)This is optional and recommended only for radios that will be used away from your home. This configuration will disconnect the radio from your home wifi but set it to begin broadcasting its own wifi so it can be accessible without an internet connection.
You will likely need to connect to the new Wi-Fi network and SSH into the Pi again. The URL of your Pi will be the “default gateway” in the wifi configuration of the new network when you connect to it.
Configure the hotspot to broadcast on boot
nmcli connection
# grab the UUID of the Hotspot connectionsudo nmcli connection modify <hotspot UUID> connection.autoconnect yes connection.autoconnect-priority 100
Getting Started with RemoteTerm
Main Screen
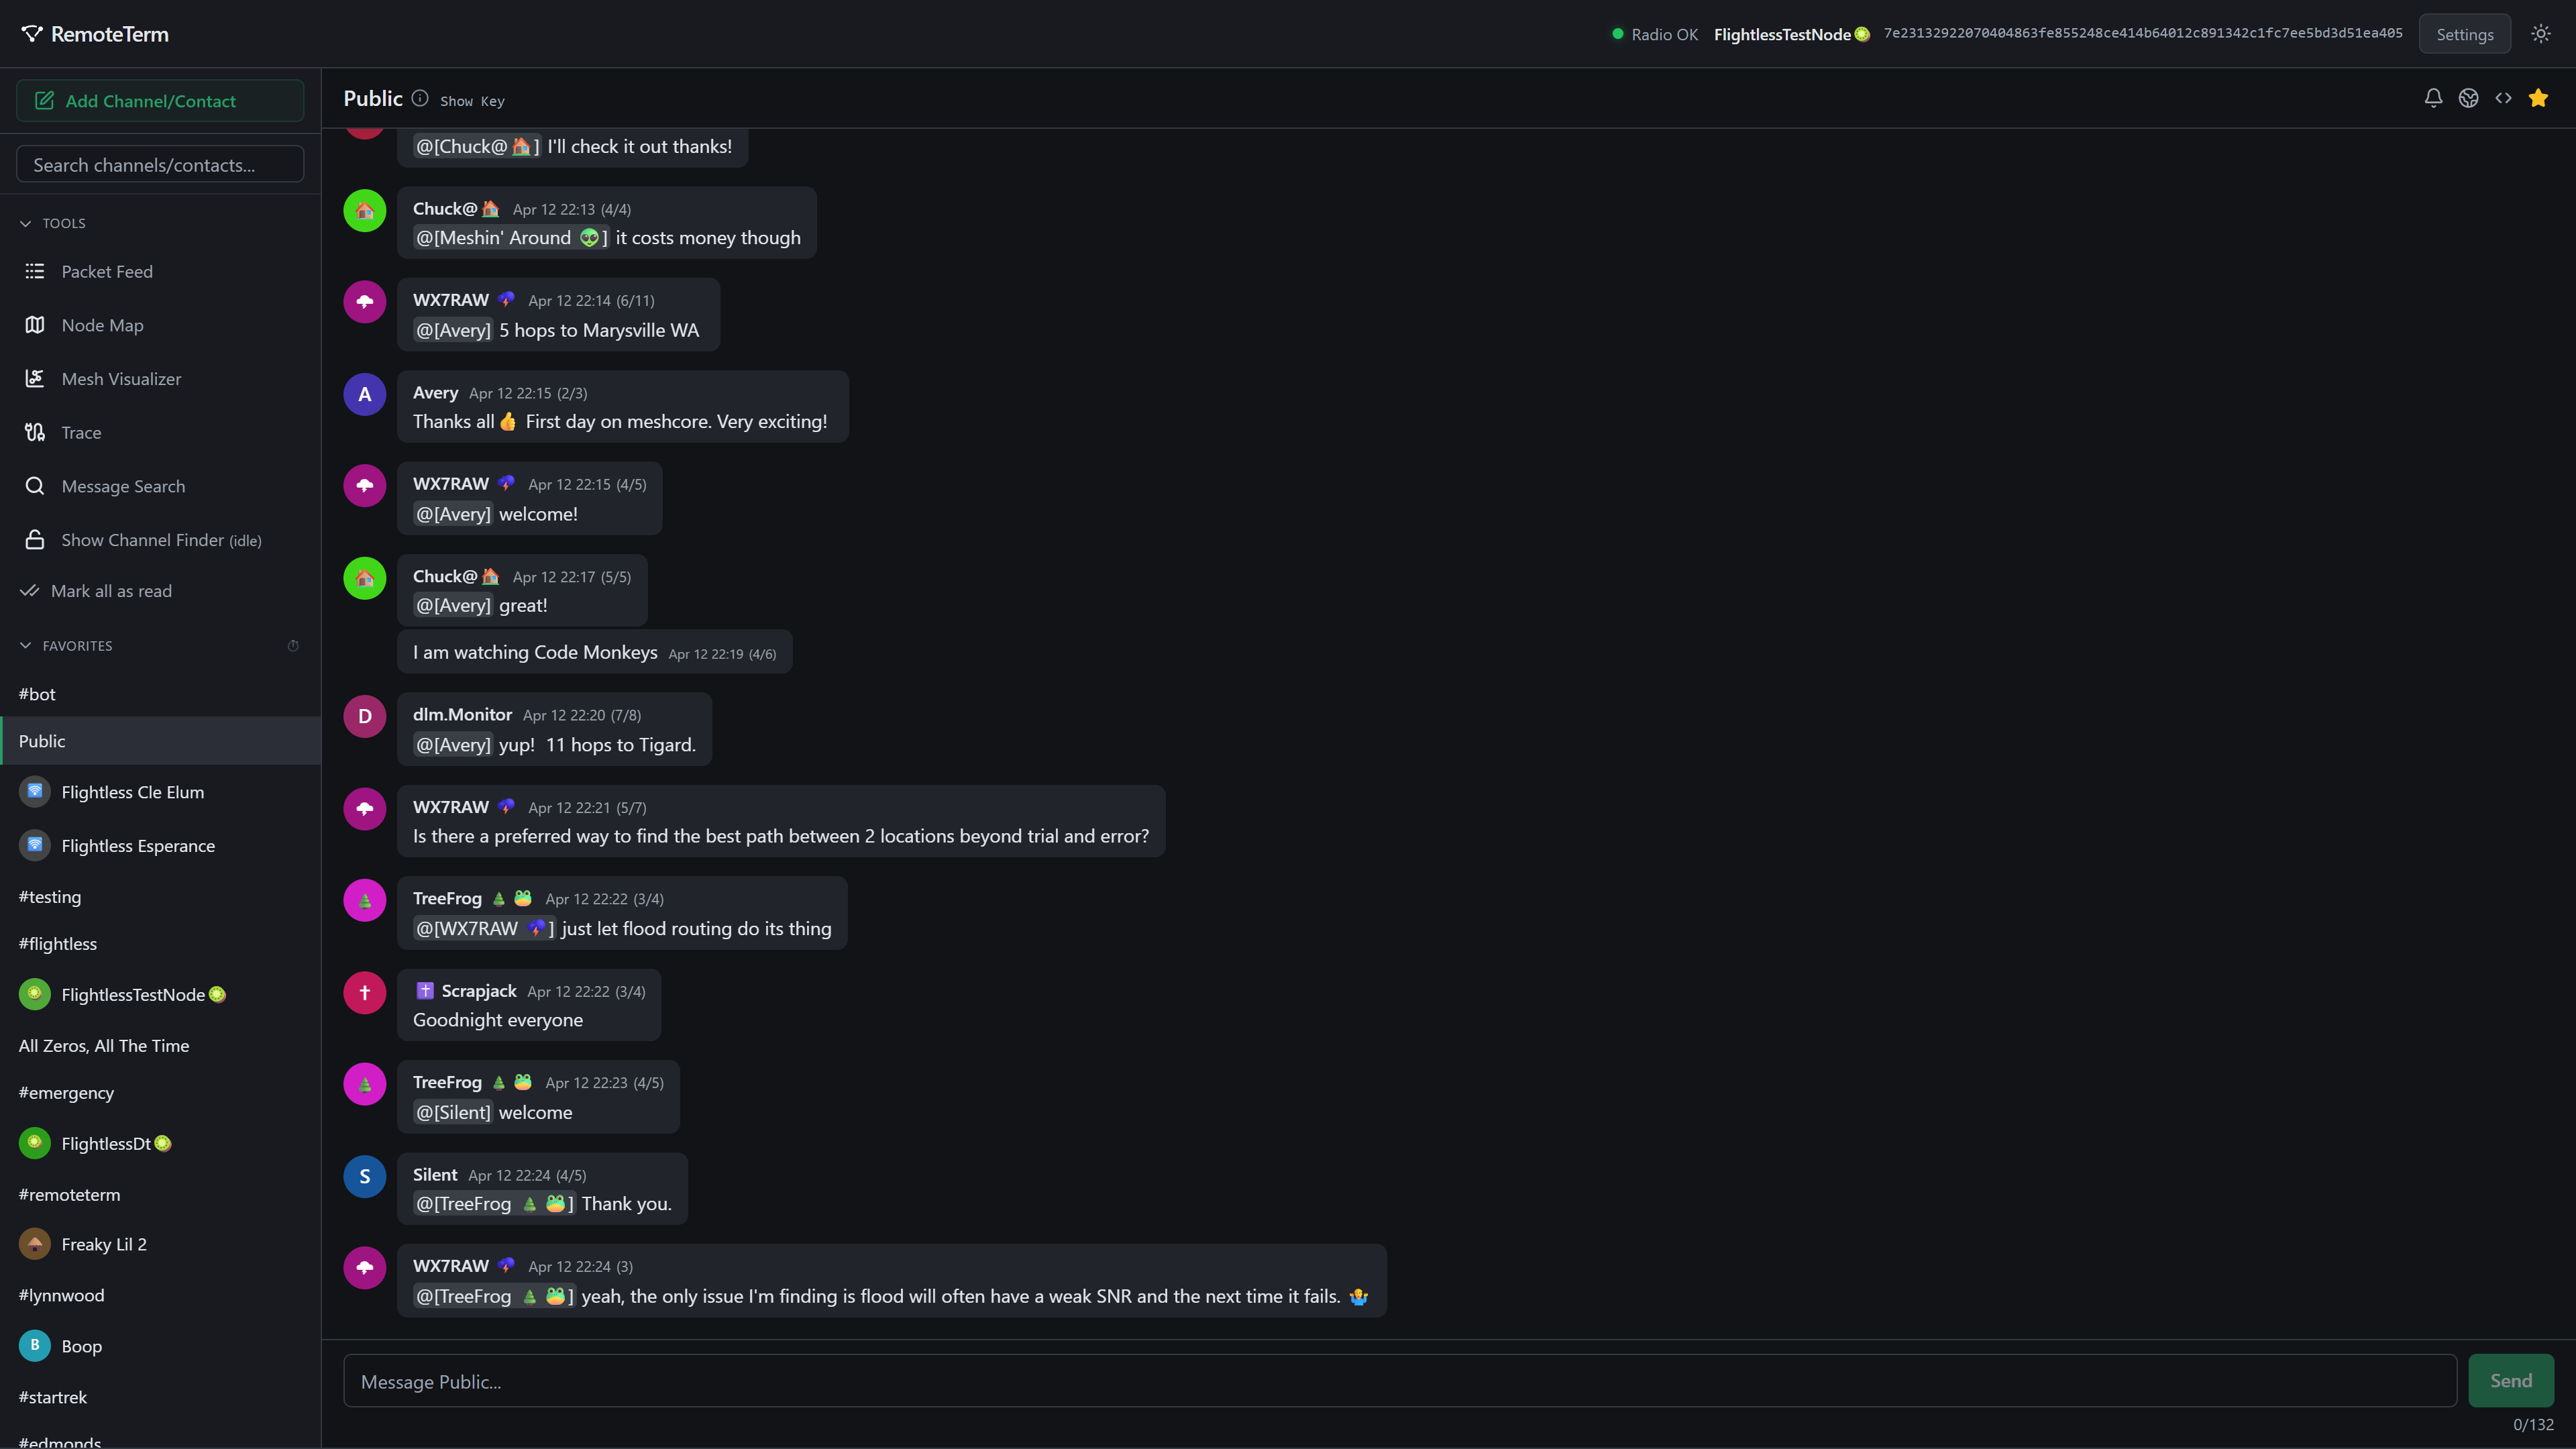
Main application screen
The main RemoteTerm screen shows a list of known channels, repeaters, and room servers, with a space for Favorites on top. Click on any contact or channel to begin messaging, or click on a repeater to log in and view the administration interface. You can add channels or contacts with the green button at the top.
Above the contact list are a set of tools:
Packet Feed
A display of raw, incoming packets as they arrive, with statistics from the current browser session. Click any packet to view an analysis of packet contents
Node Map
Visualize node location on a map
Mesh Visualizer
Customizable 3D representation of nodes and traffic in real-time
Trace
Run multi-hop traces between repeaters for signal strength information
Message Search
Search all channel and direct message history for words or phrases
Channel Finder
Public group channels are identified with a leading “#” and an alphanumeric-with-dashes name. The channel finder uses your GPU to attempt to find channel names for heard-but-not decrypted packets – discover fun chats happening around you!
Messaging (Channels)
To create or join a channel, click the “Add Channel/Contact” button in the top-left corner of the app’s main menu. Private channels, identified only by their key, or Hashtag channels, identified by their name as a #hashtag, can be joined from the menu that appears.
The Public channel is added automatically to all new RemoteTerm instances. Your local mesh will likely have its share of active channels: Public, #test or #testing, and #bots or #bot can be good places to get started or find people who can point you to good local rooms for newcomers.
When a channel is selected, the screen will look something like this:
Channel status bar
In the status bar:
[Room key]
Provides the MeshCore key for the given room
Configures notifications, either as desktop notifications (which require the browser to be open) or Web Push (which can deliver even when the browser is closed). These require a trusted HTTPS context (the snakeoil certificates available from the installer may or may not be sufficient to allow notifications, depending on your operating system and browser)
Enables regional routing overrides, which limit the radio’s regional scope when it sends messages only in this channel. Users with corresponding or different region settings will be able to see or auto-ignore your messages, respectively
Allows for per-channel hop width overrides separate from your radio default
Adds or removes a channel to your favorites
Deletes the channel, but retains historical messages if you choose to add it back later
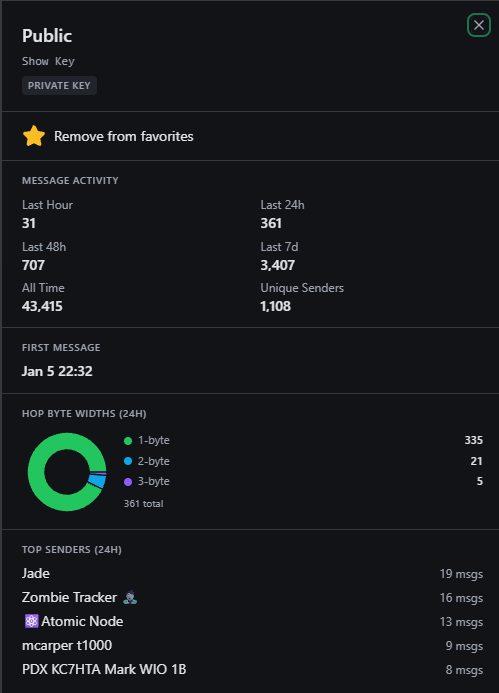
In the upper left corner is the channel name with an info icon; you can click this to see information about the channel, like how active it is, who is sending messages, and its key (which you can also see by clicking the “Show key” text in the top status bar):
Example room analytics
Messaging (Direct Messages)
Sending direct messages works similarly to channel messages, with a few different options.
DM status bar
[Contact key]
Provides the MeshCore key for the given contact and information about when they were last heard (advert, message, etc.), and the method (direct, or what path the packet took)
Sends a routed probe to the contact to discover a more ideal routing path for messages to follow
Sends a direct trace to the contact, with remote and local SNR data
Configures notifications, either as desktop notifications (which require the browser to be open) or Web Push (which can deliver even when the browser is closed). These require a trusted HTTPS context (the snakeoil certificates available from the installer may or may not be sufficient to allow notifications, depending on your operating system and browser)
Adds or removes a contact to your favorites
Deletes the covnersation, but retains historical messages if you choose to add it back later
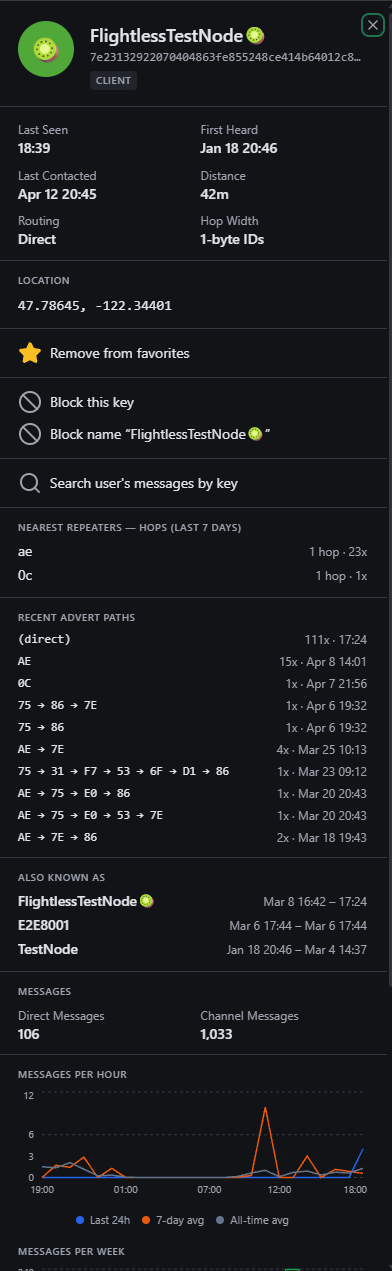
Similarly to channels, you can click the info icon or the name in the top bar of a selected contact to see analytics for the contact:
Contact analytics
Settings
Settings area
Access the settings pane from the “Settings” button in the upper right.
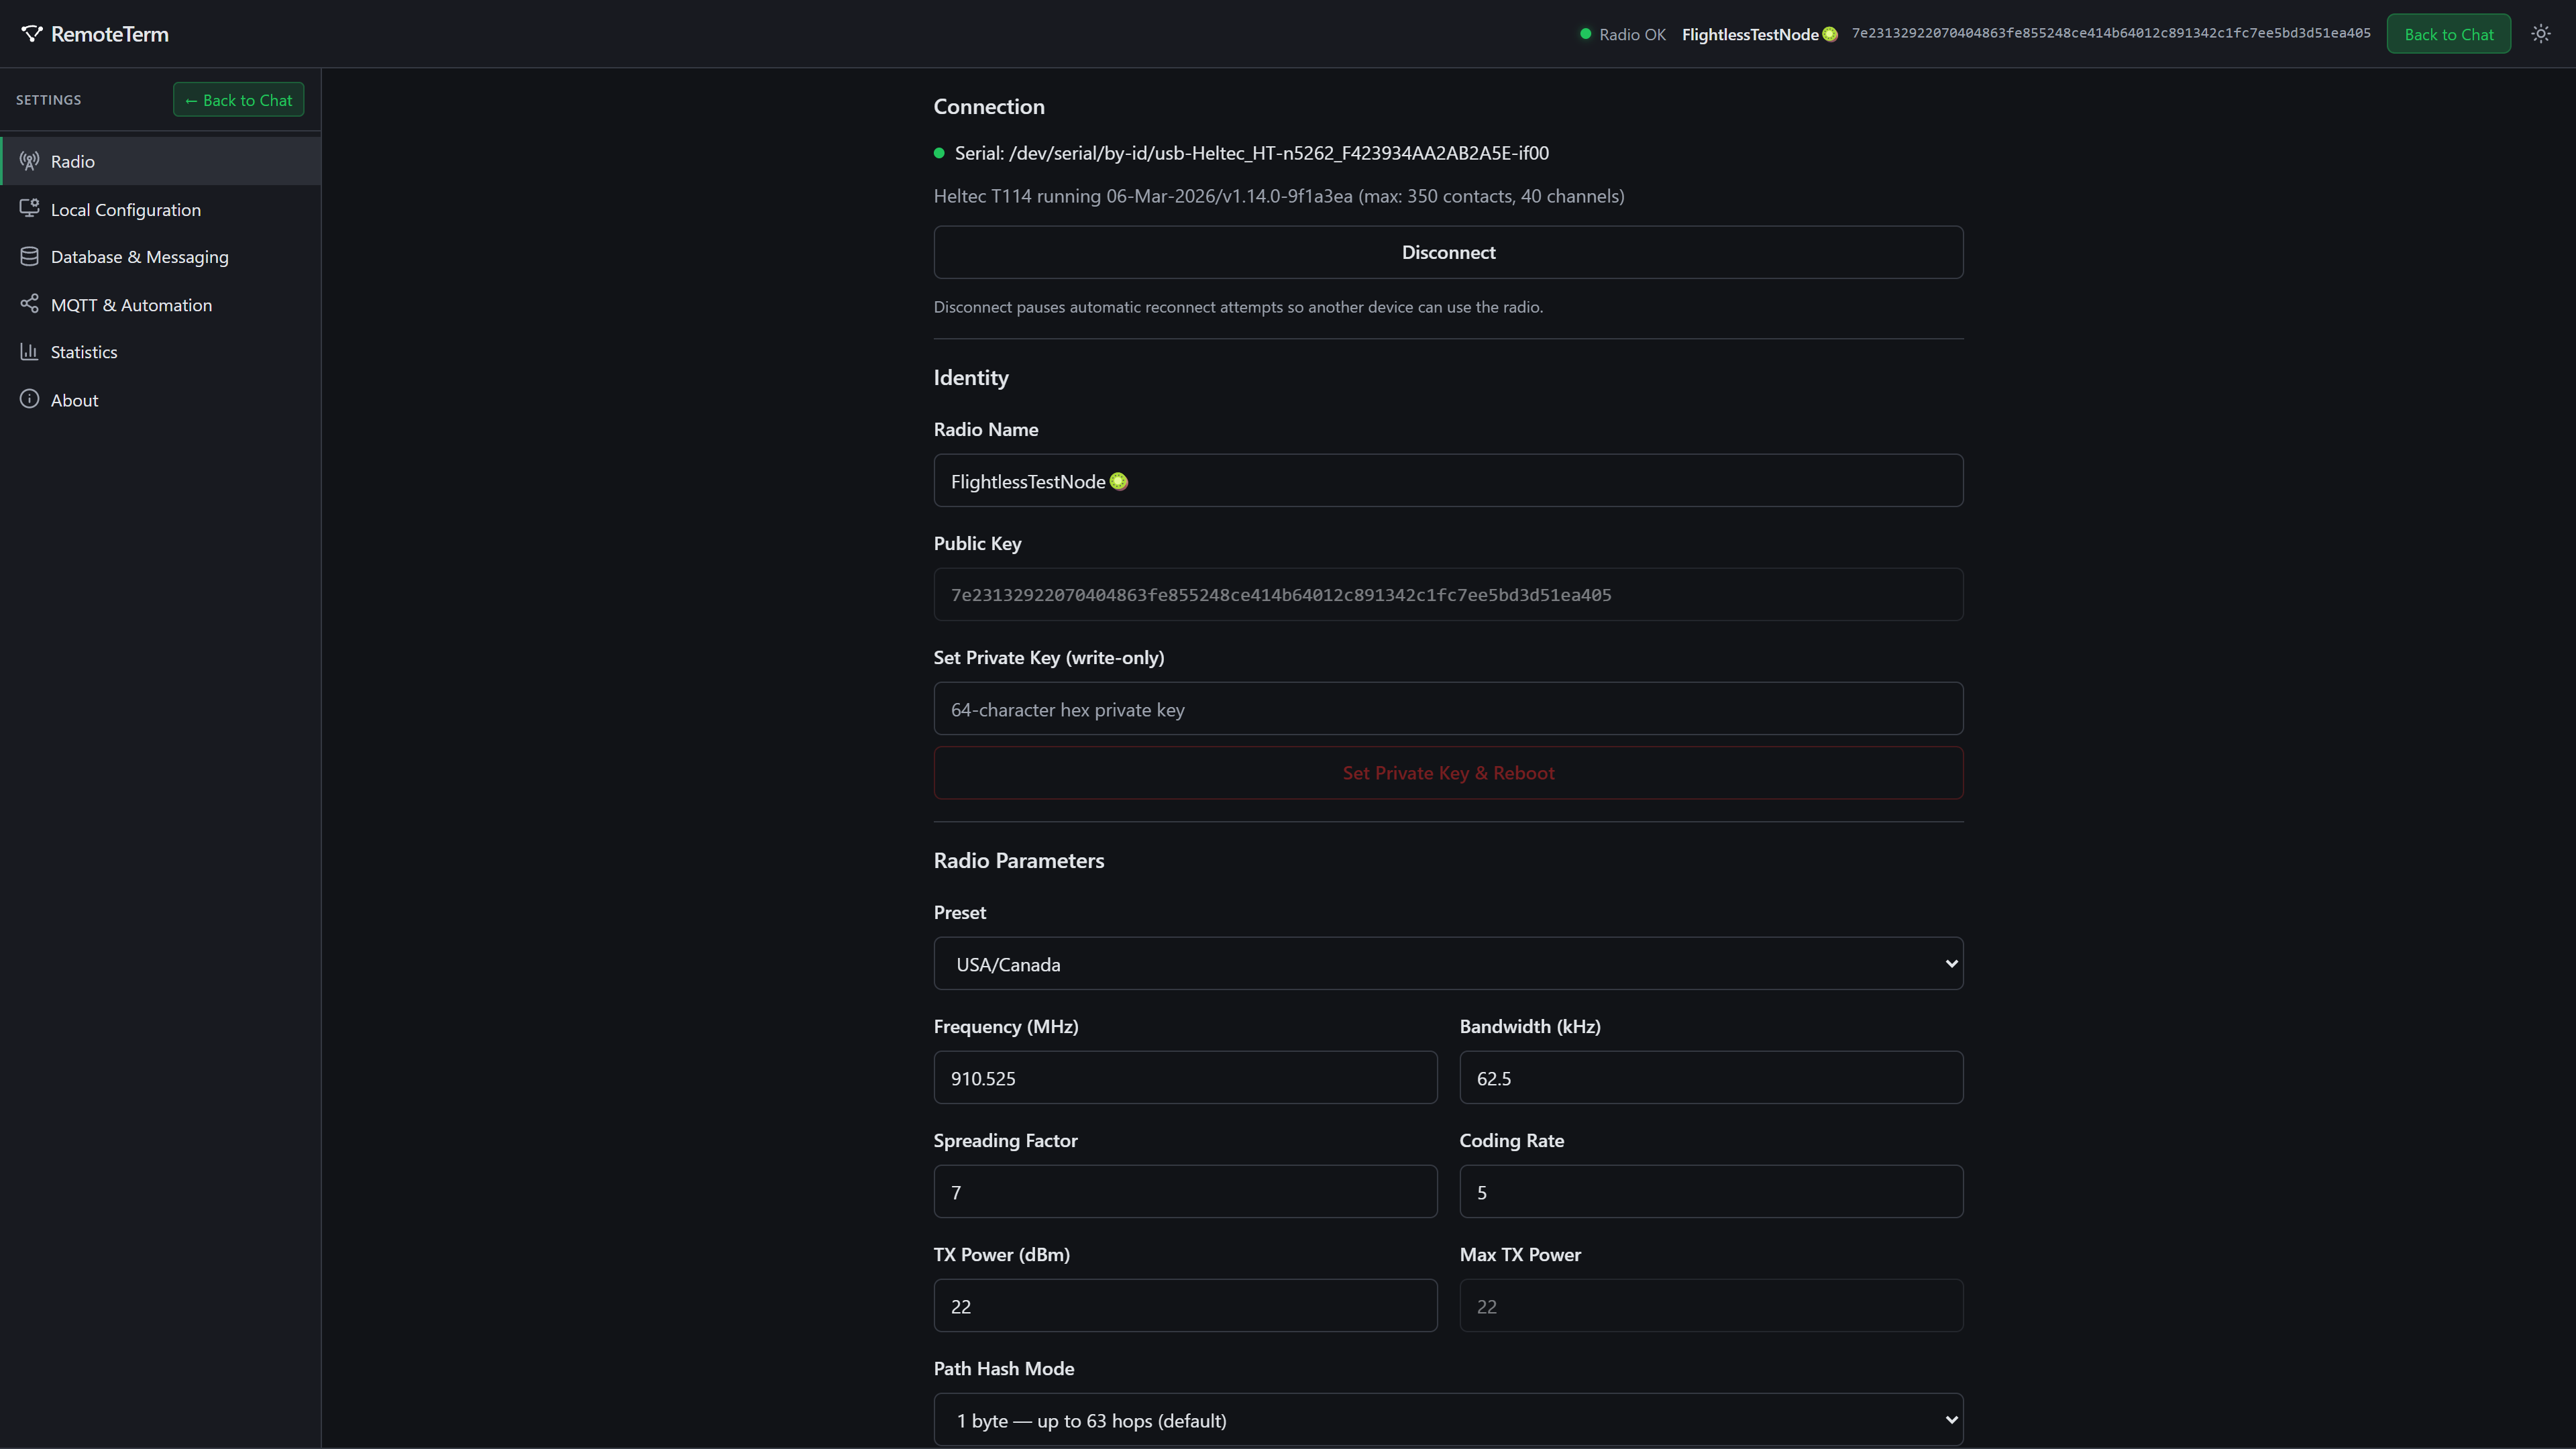
Radio
Set up your radio’s name, keys, radio parameters, location, and some tweakables, such as automatic retry, multiack, and advertisement intervals. You can also manually send advertisements and send our discovery requests to find nearby nodes.
Local Configuration
Customize your RemoteTerm’s look, feel, and behavior.
Database & Messaging
Manage historical data retention, DM decryption settings, tracked repeaters, and block or purge auto-added contacts.
Statistics
See data about the MeshCore nodes around you and your RemoteTerm instance.
MQTT & Automation
RemoteTerm shines in providing rich integrations for automated systems. Integrations perform actions when packets of certain types are heard (for example, when a message is sent in a channel or a DM is received). These include:
Forwarding packets over MQTT to:
Private brokers: send raw or decrypted packets/messages from all or selected channels/contacts
Community aggregators: send raw packets to communal MeshCore statistics and mapping projects like MeshRank or LetsMesh
Home Assistant: publish MQTT discovery payloads for tracked repeater battery level/noise floor/sensors, messages from all or selected channels, contact GPS location, and local radio status to Home Assistant via HA’s built-in MQTT integration
Webhooks, sending GET or POST requests to a specific URL with message data
Apprise, a flexible notification fanout tool that can forward to Discord, Telegram, SMS, email, and much, much more
Enqueueing packets or messages in Amazon SQS queues
Python bots that execute code on each received messages, and which can send messages back to users in DMs or channels
Let’s get some set up!
Set Up Your First Integration: Contribute to Community Mesh Mapping
MeshCore exists in many places, and the mesh is growing every day! However, not all MeshCore networks are linked, so not all messages are heard everywhere. However, an overall view of the mesh — what nodes are where, what messages are flowing in what patterns, and connectivity breakdowns, etc. — can be helpful to the community in understanding the network and troubleshooting. To provide this debug view, community aggregators ingest a feed of raw packets from observers. These observers report which packets they hear, which enables maps and statistics to be gathered about the mesh. Importantly, community aggregators receive only raw packets, meaning the packets you hear are sent to the aggregator while still encrypted. No private communications are sent to the aggregator in a way that allows it to read them, so your DMs and decrypted group messages remain securely yours.
RemoteTerm makes it easy to use the same radio you use to send and receive messages to contribute to these community mapping and visibility efforts as an observer node.
Note
MeshCore does not allow for messages to enter the mesh via MQTT nodes (as Meshtastic does); the community observability efforts are read-only.
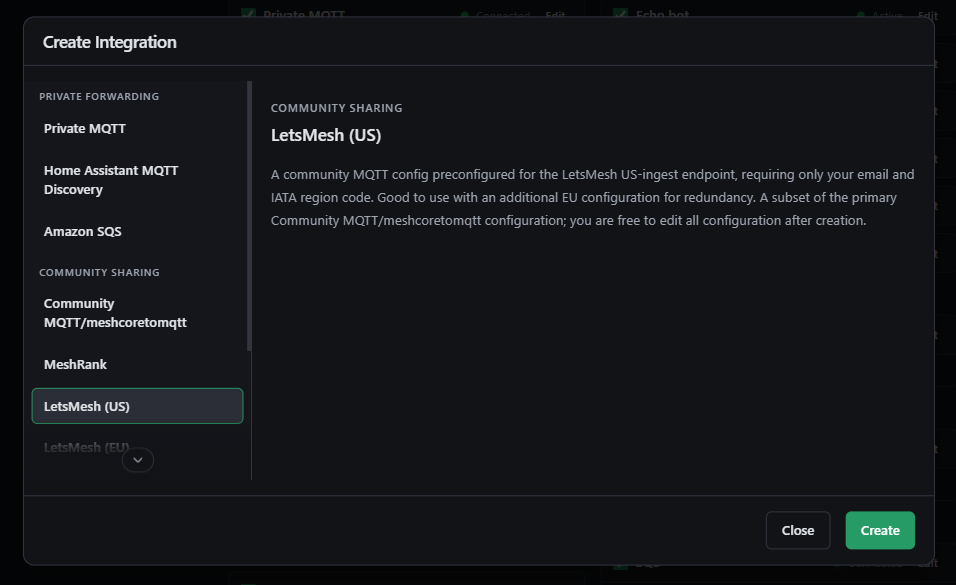
There are many community observer platforms, but LetsMesh is one of the more popular, and that’s what we’ll set up.
Go to https://analyzer.letsmesh.net/ in a browser. Click “Log In,” then follow the prompts to create an account on the LetsMesh forums, and log in to the LetsMesh analyzer.
In RemoteTerm, navigate to “Settings”, then click “MQTT & Automation”.
Click “Add Integration,” and choose “LetsMesh (US)” from the list on the left.
Integrations creation menu
Click “Create”.
Fill in the same email you used to sign up with LetsMesh, and enter the nearest airport’s IATA code
IATA codes are used for general geographical grouping. For example, SEA tells LetsMesh you’re in the general Seattle area; AKL tells LetsMesh you’re in Auckland. It doesn’t have to be a precise match, and you can look up your local airport here. Make sure you use the three-letter IATA code, and not the four-letter ICAO code.
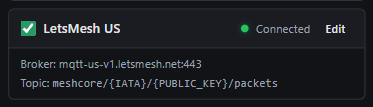
Click “Save as Enabled”.
You should see a green dot and a “Connected” status; a healthy integration should look like this:
Healthy community mesh integration
If you instead see an amber dot, click the “ⓘ” symbol by the Edit button to see the error.
Now, navigate to https://analyzer.letsmesh.net/my-nodes. Within about 15 minutes, you should see your radio appear green there, and your own telemetry and packets being forwarded to LetsMesh!
Healthy community integration providing data to LetsMesh
You can repeat the setup with LetsMesh’s EU observer; the data being sent is the same, but having two servers to report to means that your observations can still be logged even if one of LetsMesh’s ingestion endpoints goes down.
Tip
You can have as many observer entries as you want. Some other community aggregators have their own presets, but any aggregator that supports the functionality of meshcoretomqtt can be configured to work with RemoteTerm via the general “Community MQTT/meshcoretomqtt” integration. When that integration is selected, you can configure the MQTT reporting that the aggregator needs, however.
Bots
RemoteTerm provides an interface to program your own bots. Bots consist of simple Python code that is run whenever a message is received from a contact or channel. When the message is determined to be addressed to the bot (for example, from a specific contact, containing a specific message, or in a specific room), the bot can respond to it.
Warning
Bots generate automated traffic in response to other messages and are capable of responding to their own messages. This means it is your responsibility to ensure that bots are carefully written to prevent flooding the mesh or infinitely looping. It’s highly recommended that you use a test room to try out your bot before letting it loose in a more public room.
Tip
Many local meshes prefer not to have automated traffic in their Public channel; others may have dedicated rooms where people deploy their bots by convention. Try checking in with people to see if there’s a standardized bot channel that is a good fit for your bot to respond in. Some meshes use #bot or #bot-[region] (e.g. #bot-pdx for Portland, OR).
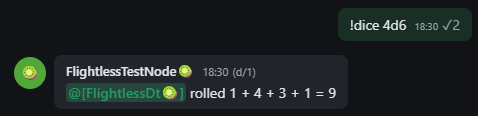
Set Up a Simple Dice Rolling Bot
This bot provides simple dice-rolling capabilities, requested in standard form (e.g., “3d6” means roll 3 six-sided dice).
In RemoteTerm, navigate to “Settings”, then click “MQTT & Automation”.
Click “Add Integration,” and choose “Python Bot” from the list on the left.
Click “Create”.
Name the bot something descriptive, like “Dice Bot”.
Erase the code from the editor, and paste the following code instead:
importrandomimportredefbot(**kwargs) ->str|list[str] |None:
"""Dice roller — responds to !dice NdS in #bot only.""" sender_name = kwargs.get("sender_name")
message_text = kwargs.get("message_text", "")
channel_name = kwargs.get("channel_name")
is_outgoing = kwargs.get("is_outgoing", False)
if is_outgoing or channel_name !="#bot":
returnNonematch= re.match(r"^!dice\s+(\d+)d(\d+)$", message_text.strip())
ifnotmatch:
returnNone count, sides =int(match.group(1)), int(match.group(2))
if count <1or count >20or sides <2or sides >100:
return"I don't know how to roll that! [1-20]d[2-100]" rolls = [random.randint(1, sides) for _ inrange(count)]
parts =" + ".join(str(r) for r in rolls)
name = sender_name or"Someone"returnf"@[{name}] rolled {parts} = {sum(rolls)}"
Click “Save as Enabled”.
Using another radio, navigate to the #bot room and request a dice roll (e.g. “3d6”). The output should look something like this:
Dice bot in action
If you don’t see the response as expected, you can check the server logs from your Docker container to see if there is an error reported when the Python code is executed.
Set Up a Path Width Bot
MeshCore firmware v1.14+ brought big changes to how messages traverse the mesh; packets traversing compatible routers can now carry multibyte hop identifiers, which makes it much simpler to determine the path a message took over the mesh. We can make a bot to help people determine whether a multibyte path is associated with their message (meaning both they and all repeaters along the path are running firmware 1.14+).
This script uses the ability to send multiple messages in response by providing a hop-width message and the packet hop data itself.
defbot(**kwargs) ->str|list[str] |None:
"""Report the sender's path hop width in #bot.""" sender_name = kwargs.get("sender_name")
message_text = kwargs.get("message_text", "")
channel_name = kwargs.get("channel_name")
is_outgoing = kwargs.get("is_outgoing", False)
path = kwargs.get("path")
path_bytes_per_hop = kwargs.get("path_bytes_per_hop")
if is_outgoing or channel_name !="#bot":
returnNoneif"!hopwidth"notin message_text.lower():
returnNone name = sender_name or"Someone"if path_bytes_per_hop isNoneornot path:
returnf"@[{name}]'s hop width is unknown (no path data)" hop_count = (len(path) //2) // path_bytes_per_hop
if path_bytes_per_hop ==1:
msg =f"@[{name}]'s hops are 1 byte wide; they might not be on 1.14+ or there may be incompatible repeaters in the path."else:
msg =f"@[{name}]'s hops are {path_bytes_per_hop} bytes wide; they are using firmware v1.14+!"return [msg, f"Heard via {hop_count} hop{'s'if hop_count !=1else''}"]
Forward MeshCore Channel Messages to Discord
Apprise is a flexible notification service supported by RemoteTerm. Apprise lets you choose one or many of hundreds of notification services to send channel or direct messages to, from Discord to Telegram to SMS, email, and much more.
As an example, we’ll use Apprise to forward all messages in a particular MeshCore channel to Discord via RemoteTerm.
Open Discord to a channel you have administrator privileges in.
Right-click the channel name and click “Edit Channel”.
Click “Integrations” in the left menu, then click “Create Webhook”.
Name the webhook appropriately and copy the webhook URL. The webhook should take the form of https://discord.com/api/webhooks/<WebhookID>/<WebhookToken>
Discord webhook configuration
In RemoteTerm, navigate to “Settings”, then click “MQTT & Automation”.
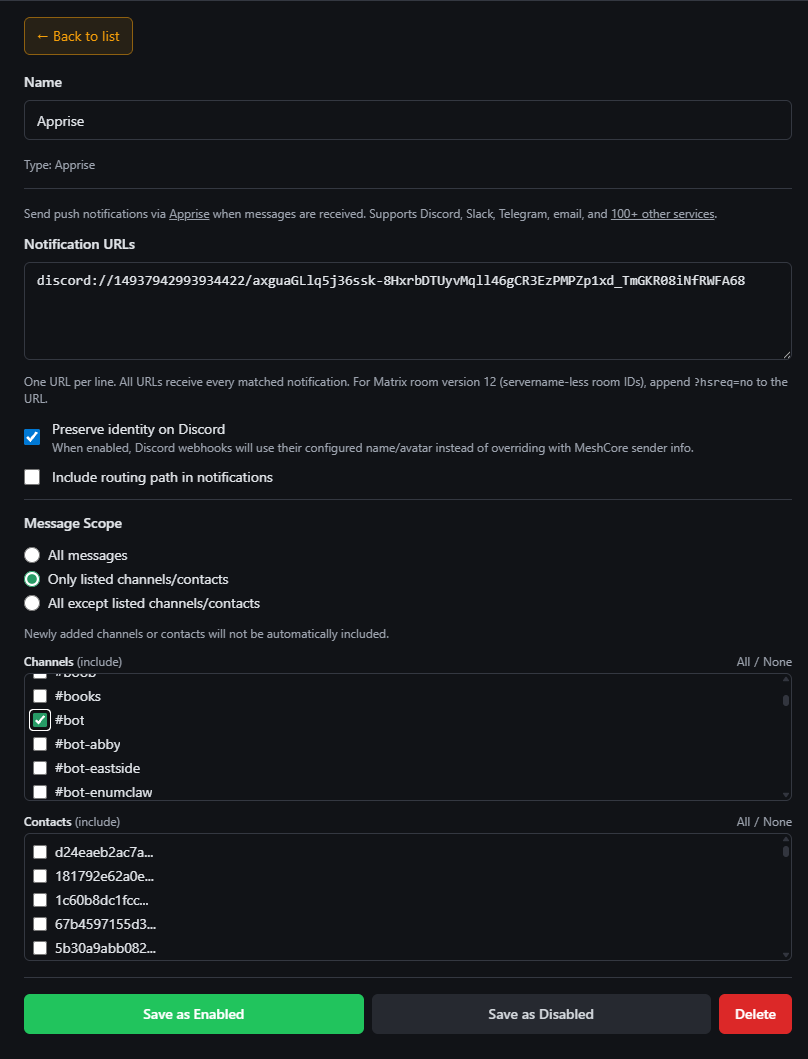
Click “Add Integration,” and choose “Apprise” from the list on the left.
Click “Create”.
Add a notification URL to the input. Per Apprise’s Discord documentation, this should take the form of discord://{WebhookID}/{WebhookToken}/. Use the WebhookID and WebhookToken from the copied URL.
Choose whether to preserve the user’s identity by using their configured name and avatar when available (suggested to be enabled).
Choose whether to include routing path data in the message (suggested to disable)
Select the contacts/channels you would like forwarded to Discord, and “Save as Enabled”.
Configured Discord integration
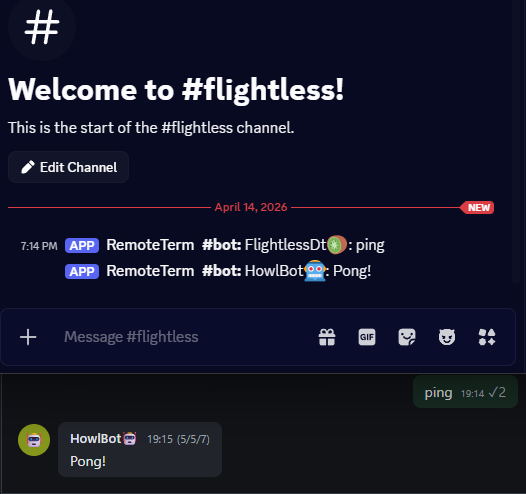
Once enabled, you should see messages begin to flow! If you have trouble or don’t see messages you expect, check the server logs for any reported errors, or try enabling all channels to ensure that at least the RemoteTerm <=> Discord linkage is working.
Discord integration in action
You can see a full list of the services that Apprise supports, and their config URI formats, in the Apprise documentation. Their URI builder makes it simple to configure complex Apprise URLs.
Integrate RemoteTerm with Home Assistant
Home Assistant provides a framework for simple-to-use, powerful home automation. RemoteTerm offers integration with Home Assistant via the built-in MQTT integration (MQTT Discovery). With this integration, you can trigger automations based on messages, monitor repeaters and local radio telemetry, and track contacts via GPS in their advertisements.
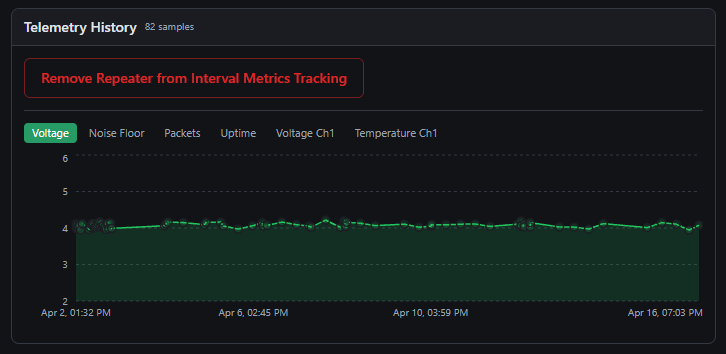
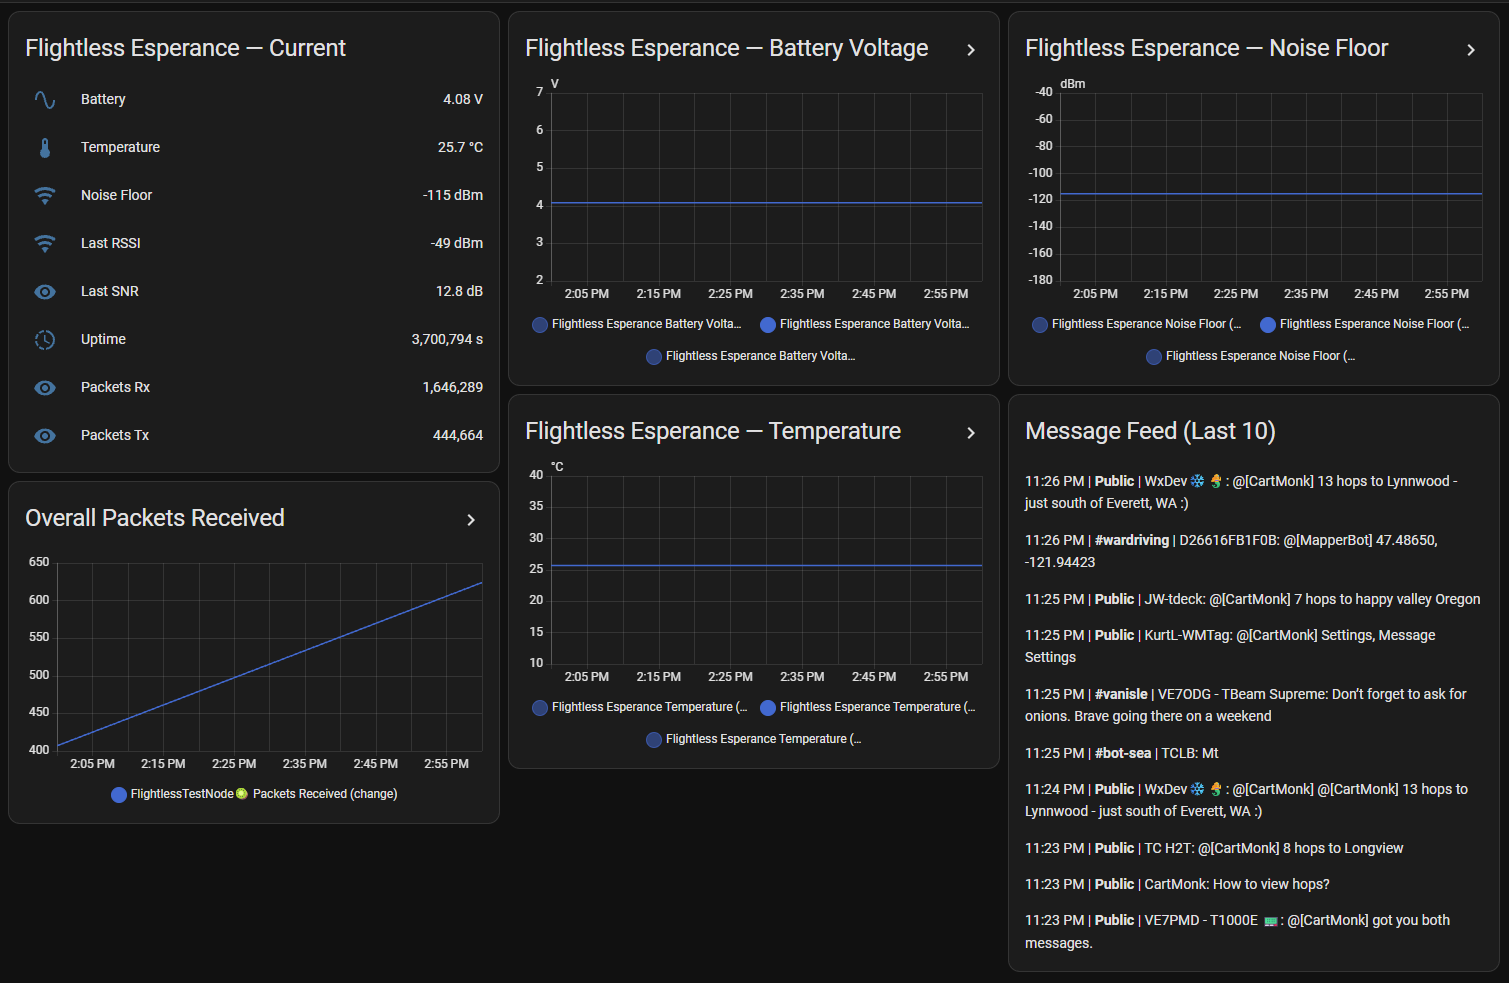
In order to take advantage of repeater telemetry tracking, you will need to enroll the desired repeaters in automatic telemetry fetch. Once enrolled, RemoteTerm will request telemetry at a configurable interval, retaining historical values and making up-to-date values visible in Home Assistant. To configure automatic telemetry fetch, log in to your desired repeater in RemoteTerm by selecting it in the sidebar and providing credentials. Scroll to the bottom and click “Opt Repeater into 8hr Interval Metrics Tracking”. Once enrolled, metrics will be fetched by default every 8th hour in the UTC time zone (midnight, 8:00 AM, 4:00 PM). After successful enrollment, data metrics will show collection within 24 hours.
Enrolled repeater telemetry history
Tip
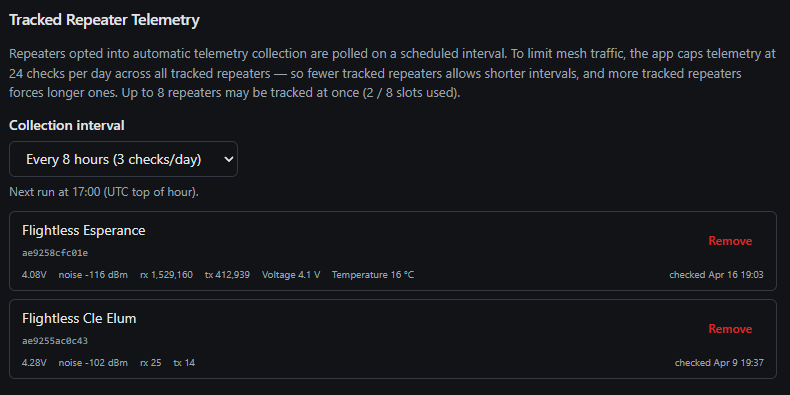
Automated repeater telemetry fetch has a customizable interval; you may choose a frequency ranging from once hourly to once daily, with the restriction that automated fetches may not exceed 24 in one 24-hour period. Thus, a single repeater may be checked at most hourly, two repeaters may be checked at most every two hours, and the maximum of eight tracked repeaters may be checked at most every eight hours.
You may configure your automated telemetry fetch interval in Settings under the “Database & Messaging” section.
Repeater telemetry auto-fetch configuration
Once you have configured your tracked repeaters as desired and [MQTT Discovery is enabled in Home Assistant, you can configure an integration in RemoteTerm to start the data flow.
In RemoteTerm, navigate to “Settings”, then click “MQTT & Automation”.
Click “Add Integration,” and choose “Home Assistant MQTT Discovery” from the list on the left.
Click “Create”.
Enter your MQTT broker information, including host and port, and username/password/TLS configuration, if applicable.
Choose contacts to track via advertisement GPS location in Home Assistant.
Select your telemetry-tracked repeaters you wish to see in Home Assistant.
Choose the message scope for triggers within Home Assistant.
Click “Save as Enabled”.
Note that the RemoteTerm integration config screen provides the exact created topics/entities in the dropdowns “What gets created in Home Assistant” and “Published Topic Summary”.
Warning
Tracked contacts and repeaters will create entities in Home Assistant; you may wish to limit your selection to only the contacts you care about to avoid cluttering Home Assistant.
Message events do not create entities and are only used for triggers; there is generally no concern with allowing all messages to flow to Home Assistant.
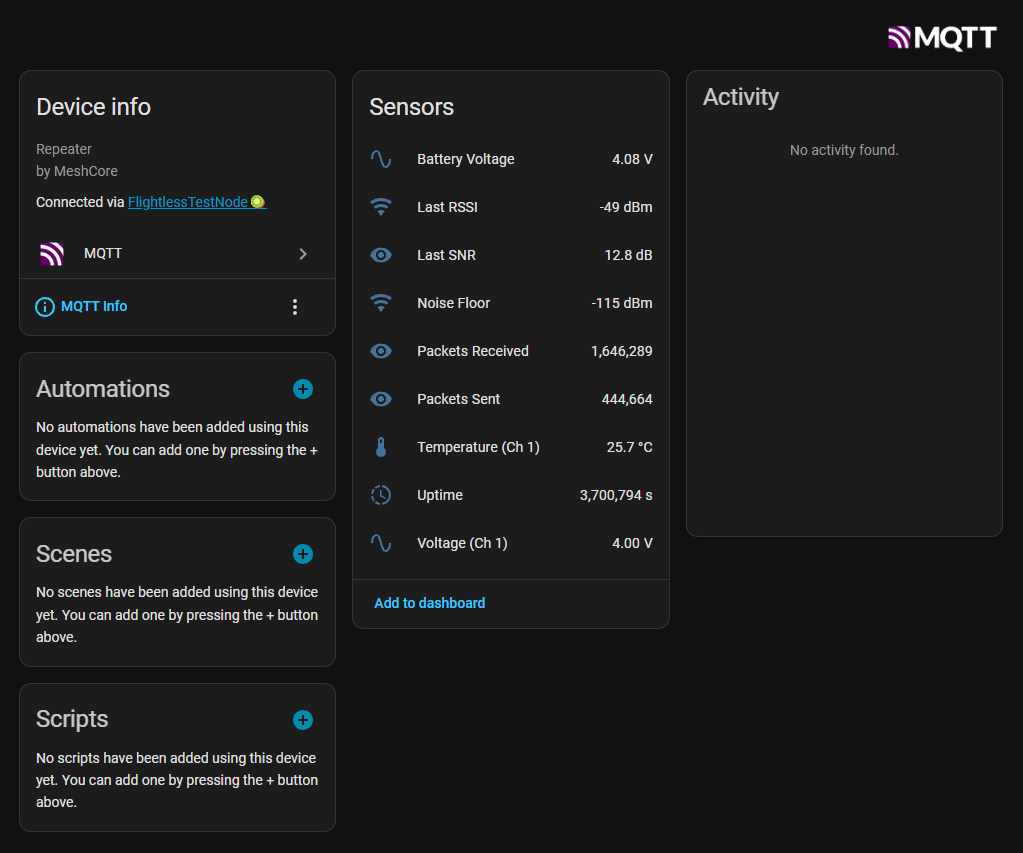
To view the new entities, log in to your Home Assistant web interface. Click Settings, then Devices & Services, then MQTT. You should see your tracked entities displayed.
Example MQTT Home Assistant integration showing radio entities
Click on them to view their available metrics. For repeaters, the most recently available non-stale metrics will be displayed; if you have only recently enabled automated telemetry fetch, you may need to wait up to eight hours for all repeater and radio telemetry fields to populate within Home Assistant.
MeshCore has a vibrant mix of people exploring radio, emergency preparedness, and the wonderful communities within local channels. Automate your home, install RemoteTerm via your browser as a mobile app and get push notifications for your favorite channels, or set up your own repeater to join the growing infrastructure! As you journey through MeshCore, RemoteTerm can serve as your base of operations and integration with other services as your mesh usage grows!
Keep up to date with RemoteTerm’s development or ask questions by joining the official MeshCore Discord, then following RemoteTerm’s development thread. The codebase updates often and you can catch the latest release in the Changelog, and, of course, RemoteTerm is free, ad-free, and open source forever — give it a star on GitHub.